
But, meanwhile I'll keep you and your fingers busy with a new tutorial:
 Eddi says his grandmother used to wear her hair like this. This do most likely even has some name that I just don't know of. It's easy to make and good for the days your hair is starting to get a little dirty or messy from old curls. But it will also work when your locks are too clean and light. If my hair is any of the two first options I like to make the do a bit loose and messy and if my hair is newly washed I roll it sleek and tightly. When rolled loosely with curly brushed out hair you can also imitate something of a belle époque look, and why not add some piece of jewellery too. But more on the variations later.
(You've seen the do here and here before for example.)
I'm making mroe of the messy do here; my hair is a bit frizzy and I'm in a hurry.
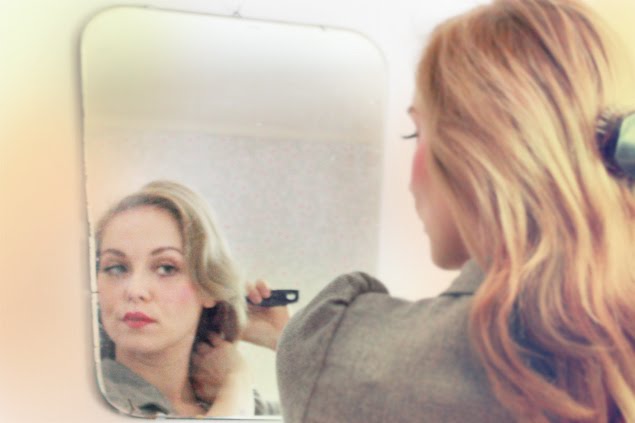
 First, brush out the hair and keep it in your normal parting. I guess you could pin the hair in the back to keep the crown sleek, but I don't.
Start by twisting your hair upwards. I start a little bit before my parting. You have to twist quite tightly in the beginning as the roll will loosen up before you have the time to pin it. Keep on twisting along your hair line.

 When you reach the ear you can stick in a pin to secure it, in this case my hair is messy enough so I won't need to.
Keep on rolling past the ear and downwards, grabbing more hair along. Roll it rather tiglty (and yes, it looks disguisting when the skin stretches but it will loosen up:)
 When rolling the back, try to make sure all hairs join the roll, and that no sections are too puffy on the top of your head. You can correct this a little bit afterwards while pinning too, or in between if your grip on the roll is hard enough.
 The tricky part is the other ear. Just keep on rolling past it, don't let go.
 When you reach the beginning of your roll you start twisting the hair around it again. It sounds a bit tricky but it's actually not! You might have to do it a bit slower at this point and really twist and roll it to make it stay.
 Secure with bobby pins; stick them in the roll. You can also use bigger pins in the back, twist them into the hair to make the roll stay.
 Zig zag your hair a bit if it feels too tight by pressing the roll towards your headwith your hands, although remember the roll will loosen up after a while.
Correct and sleek uneven sections with you hands and/or a comb, spray or add your product of preference.

This will work on shorter and longer hair; the shorter the hair the thinner the roll will be.
You can also make the roll in two parts; one in front and another in the back (like the "back roll 'do". And, also, you can use a rat in both the front and the back for a bigger do, both in the all-round version but especially if you choose to make one in the front and another in the back.
This is a great do for small hats as they will fit nicely on in the middle of your roll. If it's very cold and your little ears will freeze without being covered up, you can use a head band, like I do here.
So, good luck with the rolling. And remember, if you ever try out any of these hairdo's I'd love to see pictures!
ps. mini version of the tutorial:


58 comments:
Wow! Thank you so much for posting! This is absolutely amazing work of hands! :)
Would it work for the hair that is at the top of the shoulder blades in length?
The Black Opal : thank you. I think this will work for most lengths. The longer the heavier the roll will get and it will need more pins, but I think shoulder blades should be real good! And if it feels too tricky in the beginning, do the version with one roll in front and another in the back :)
Oh thank you so much for posting this tutorial! It must have taken a long time to do but it's so clear and easy to understand. I'm hopeless with my hair and envy girls with elegant 'dos, but I just gave this a go with your instructions and I think I can manage it! Hurrah! x
The Postcolonial Rabbit : thanks, glad you like it. And yes, I am seriously considering videos from now on ;D
Så snyggt! Brukar göra liknande frisyrer emellanåt men har aldrig rullat hela vägen runt så där. Ska definitivt prova!
love the 'do. awesome!
You make it look and sound so easy. I suppose it's a matter of practice to get it right. The hairdo really suits you!
I always love your how to's on hair. I can't do most of them since half of my head is bald and I have short hair, but this one actually looks good on me. Have to practise some more though to get as good as you are, ha!
Thank you! My hair is very thick and heavy but I've managed to make some semi-rolls..this tutorial takes me trough the points that I have trouble with! And you explain very well!
And I will certainly post pictures at my blog and let you know if I can make this do turn out well ;)
Miss M
I love this hairdo, unfortunately my hair is a bit too short atm to make a goodlooking roll. I'm a bit too lazy to create hairdo's on weekdays and that's why I tend to keep my hair short, it's just easier and quicker. Even though this doesn't look too timeconsuming =) Thanks for the tutorial, I will definetly try this when my hair is a bit longer.
Härligt med mer snygga frisyrer poster från dig :)
Men klänningen då, eller är det en blus, den är ju underbar ju!
Var kommer den ifrån?
Terese
Thank you for this post. I actually tried to roll my hair like this as a child. I had seen the hairdo in a movie. I never managed to to it right. But I was like 9 or 10 years old. Now I will give it another try!!!
You make it look so easy! I still have trouble with a bun. Le sigh.
Kxx
http://duenotice.blogspot.com/
so pretty! thanks for sharing!!
check out my blog if you have a chance!! xx, alex
http://www.ivoryinklings.com
My hair is shorter now, but I used to wear it like this all the time when it was a little longer, always perfect for my small 50s style crown hats! I keep a picture on my vanity of my Grandmother with a continuous roll, it always looks so polished!
xoxo~Syd
I love this – and I will give it a go, and send you a pic (or a link of one) if I am successful... :)
Oh, how fun. What a great tutorial. I wonder if this would work on my naturally curly/frizzy hair. I would probably have to use a ton of product or straighten my hair first.
:) S
Yes y'all, pictures please :)
Terese : den är från Tara Starlet! FInns inte längre i sortimentet men där finns nästan likadana.
Anonymous : you won't have to straighten it, it will wprk on curls, the roll will be big. If you are super curly you might have to roll real tight and sleek it a bit on the crown.
Beautiful. Amazing. I am trying it tomorrow. Thank you so much for sharing. :)
a hairstyle I often do aswell - so easy - only I usually end in a sideknot since going all the way round looks weird with the fringe!
Oh thank you, I've always wondered how the old ladies do their hair in a roll like this!
I love this hairstyle!
It seems simple to make, I think I'll try!
Thank you for the pictures.
Kises
Oh wow! I have been wanting to try the roll style lately, though I was never sure how to quite do it without a foam form to roll my hair around. Can't wait to give this a try! Thank you for documenting the steps and sharing them. :)
♥ Casey
Thanks! It's allways nice to get real advice and inspiration.
Opting for a tutorial movie next time! :)
Oh, this is too pretty! i have to try it!
♥
Camila F.
The hairdo looks good on you. Very lovely.
you are really pretty girl with nice hair :)
Hi!
I just joined your blog and I was checking it out and random thought occured when I checked out your hair tutorial, with that cute blazer and your hair style, you remind of of 'Rosalie' from Twilight =)
I've been wearing a similar style during those hectic mornings where I seem to have no time to really do my hair how I'd like. It's very pretty on you! :)
So pretty! I'll have to try this, even though I feel updos make my head look funny.... you pull them off so well:)
Well... I tried it! I thought it looked pretty nice! It's a good hairdo for going outside because it's pretty, simple, stable (no hair sticking to my lipstick) and works well with earmuffs:) Thank you for this tutorial!
Pictures of the result are here:
http://yesteryearvintage.blogspot.com/2011/02/snowpocolypse.html
Oooh I love it, You look gorgeous! I'm going to try that myself I think...I've been trying out to some up do's lately....it's taken me about 2 years to grow my hair passed my shoulders...since have a very short bob and I've been a bit precious about tying it up...but I've been experimenting...this is definitely on my list!! Thank you for the inspiration! x x x
I LOVE this hairdo but I just can't seem to do it - every time I get to the side where I am supposed to roll back up to my bangs I just get clumpy hair that looks all ratty and knotty and it looks horrible - what am I doing wrong? I swear I have tried over 30 times to get it - but I just can't get it!
Thank you!
Alaura Hernandez : it looks lovely :) I tried to leave a comment for you but for some reason nothing happens when I click "post a comment"
Lovelette : I guess it goes clumpy just above the other ear? Try rolling the hair in a little different angle; kind of like your pushing it more forward. It might easily get a bit tangled at this point, so try going trough it with your fingers (with the hand that does the rolling).
You can also do some -or even most - of the pinning while you are making the roll. Then you can almost let go of the roll and carefully, carefully brush the hair that still needs to be rolled. Also, roll the last part slowly and "many times", sort of twisting it more around than you had to do in the beginning.
And you can cover quite much up in the end also, sleeking with a comb and your hands.
Hope this helped!!
I tried this yesterday, my hair is shoulder lenght and really fine and it worked :) went a bit messy at one poit, i just covered it up with some flowers!
Thank you - I tried this out today and it was so quick and easy! My unruly hair that reaches the middle of my back could be secured with 3 clips/pins. And it looks so much more elegant than just scraping it back into a pony tail!
I NEED to try this! Looks like the perfect alternative to a quick chignon.
Thanks for the share :)
Thanks for the tips - they totally helped! Now I just need to practice a bit more!!
Thank you again for posting this tutorial! I always am inspired by your hairdos! :D
Completely unrelated to your hair tutorial (which are always nice), I found this article and thought it might interest you: http://www.nytimes.com/2011/02/03/fashion/03REPRO.html?_r=1&emc=eta1
It would be nice to hear your thoughts about genuine vintage vs. repro.
Thank you for posting this! I did the tutorial and put up some pictures on my blog if you would like to see :)
http://ohnoyouagain.blogspot.com/2011/02/easy-saturday-ootd.html
This looks stunning!
Oh thanks for this tutorail, I'll be sure to try it! It looks great.
I just nominated you for a stylish blogger award here (http://rosiealia.blogspot.com/2011/02/stylish-blogger-award-for-moi.html). Accept or ignore at will, but I just wanted to let you know that I love your blog! xx
Päovi : I'll read it! But in general I think vintage and repro are two completely different things in one aspect, although they visually may be alike.
What a great idea! I'll have to try this and see if it works with short hair as well. I forsee lots of bobbypins
I love how your hair looks, I tried myself and failed, but I quite like how it turned out anyway. I blogged it here, if you'd like to see: http://sweetheartsholdhands.blogspot.com/2011/02/charity-find-of-year.html
I think my hair is too short for it to work as well as yours right now, but I am growing my hair so maybe in a year or so I'll manage your lovely look.
This looks fabulous! There's not much I can do with my hair (it really needs cutting - it's so thick that when it's long it just becomes totally unwieldy) but this looks like it would work - can't wait to try!
xx Charlotte
Tuppence Ha'penny Vintage
That's a beautiful, classic hairstyle. Really versatile too. Does it work well on thicker hair too, I wonder? Thanks for sharing!
I've been having trouble twisting the hair around the beginning of the roll the second time around - the initial roll keeps unrolling when I try to continue twisting it. Can you tell me what I'm doing wrong?
What a fantastic tutorial!! Thanks so much!!
http://inthehammockvintage.blogspot.com
Hey miss! First of all, I love your blog, I've been a silent follower for th past year and loving it. Also, I gave your roll a try adn have been smothered with compliments since, so thankyou very much! I posted some photos on my blog, If you have time, I'd been thrilled for you to see http://thechroniclesofaneccentric.blogspot.com/2011/02/la-vie-en-rose.html
Onpa kaunis, kiitos tutoriaalista. Taidan koittaa itsekin.
This is beautiful, thank you for sharing! :)
Wow, I can't believe it. This hairdo worked and my hair touches the floor! I just had to tuck and wrap a couple of times and it looks great. Thanks for posting, I would never have thought to do this.
Katie : I'm sorry I thought I had answered this! It could be that you have not rolled tight enough? You really have to grab it hard when you start reaching the other ear. Try curling your hair before for more structure, or then pin every now and then while you roll (like, when you have reached the neck, stick a few pins around the ear)
Anonymous : oh, it must have made a big and beautiful do! I'd love to see a pic...
I tried this today on my knee-length hair. It works alright, but is huge! Here's a link to a picture: http://x6b.xanga.com/85df8a0677432277511855/w221075964.jpg
Thank you!
I think I'll be trying this again and playing around with some variations on it.
Very nice, and easy hairdo!
I love such a stunning hairdo Styles.
Thanks so much for posting this! (And I only found out about your blog now but about to do some serious digging! In both senses of the term!)
I am absolutely hopeless when it comes to retro hairstyles and been trying to do even simple 40s hairdos but kept failing miserably. My hair is still too short to try the 'eternal roll' for now, but your tutorial has helped me achieve that pretty rolled up look I was aiming at for so long.
Guess there's hope for all of us in the end! Thanks a million!
Post a Comment